SAMPLE PREPARATION
-Two sets of 3 specimens are prepared for the required procedure, one in the warp direction and the other in the weft direction or, in the case of a point type, one oriented to the direction of the machine and the other in the transverse direction
-Previous tests should be done on both sides to see if they behave the same. In case of different behaviour, the worst or both sides of the fabric will be tested.
-The location of the sample holder pins is marked on the specimen in order to make the holes correctly.
-A hem should be made at the bottom of the specimen for procedure B. This hem should be 200 ± 2 mm long. The sewing thread should be fire-resistant.
-For multilayer samples composed of materials that are not continuous throughout the sample, make the specimen as follows: For procedure A, the longest dimension should be aligned vertically in the center of the sample and horizontally so that the flame falls on the multilayer area. In case of procedure B, the smallest dimension must be along the lower edge of the sample, taking into account the use in the clothing, including its union and orientation so that the flame can fall on the multilayer area. Specimens containing retroreflective tape or emblems and lettering are usually examples of multilayer specimens.
-In the case of testing seams, they must be constructed vertically from two pieces of fabric, with measurements of 200 ± 2 mm each. Alternatively, the seams can be analyzed from the final garment. The seam should be in the center of the specimen in a vertical line.
-All samples must be conditioned at least 24 hours at 20 ± 2 ºC with a relative humidity of 65 ± 5%. Tests should be performed within 2 minutes of conditioning.
PROCEDURE
-The tests must be carried out at an ambient temperature of 23 ± 5 ºC with a relative humidity between 15 – 80 % and an air flow of less than 0.2 m/s at the beginning of the test.
PROCEDURE A – Surface Ignition
-The specimen is mounted on the sample holder by nailing it to the pins of the support frame using the previously made marks.
-Verify that the sample once placed in the sample holder does not have wrinkles, draping or sagging. If it shows drooping or sagging, the sample should be taut but not stretched.
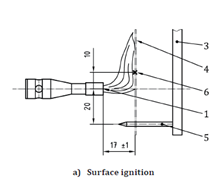
-Burner preparation: Place the burner horizontally without a flame perpendicular to the specimen so that it is aligned 20 mm above the line of the lower pins. The tip of the burner stabilizer should be 17 ± 1 mm from the surface of the test specimen. Check the position of the burner every 6 specimens.
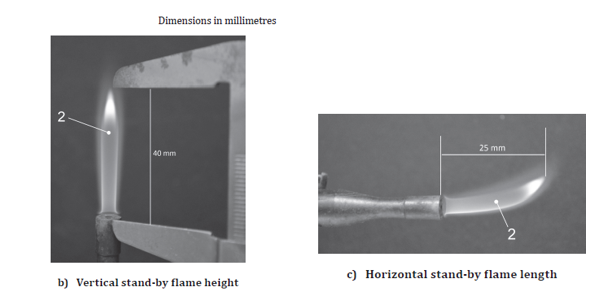
-Adjust the flame according to images after 2 minutes of preheating the flame. The measurements are from the tip of the burner stabilizer to the end of the yellow part of the flame.

-Apply the flame for 10 s and observe and record if any flame reaches the upper or vertical edge of the specimen; afterburner time measured at the nearest second; if the surface glow propagates beyond the area of flame spread (usually charred area) into the undamaged area; post-luminescence time measured at the nearest second; if there is debris; if the debris ignites the filter paper or melts; if there is a merger; Any hole formation indicate the number and size of the largest in mm and in which layer if it is a multilayer specimen.
-Repeat the procedure with the remaining 5 specimens within 20 minutes after the flame adjustment.
PROCEDURE B- Ignition at the edge
-The specimen is mounted on the sample holder by nailing it to the pins of the support frame using the previously made marks. The back of the sample should be 20 + 1 mm away from the sample frame.
-Verify that the sample once placed in the sample holder does not have wrinkles, draping or sagging. If it shows drooping or sagging, the sample should be taut but not stretched.
-In case the specimen has a seam, it must be in the center of the specimen vertically so that the flame can fall on it.
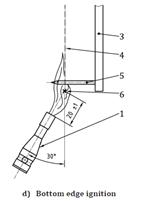
-Burner preparation: Place the burner horizontally without flame perpendicular to the specimen with an upward inclination of 30º for the lower edge of the specimen. Ensure that the distance between the tip of the burner stabilizer and the bottom edge of the specimen is 20 ± 1 mm. Check the position of the burner every 6 specimens.
-Adjust the flame as described in procedure A.
-Apply the flame for 10 s and observe and record if any flame reaches the upper or vertical edge of the specimen; afterburner time measured at the nearest second; if the surface glow propagates beyond the area of flame spread (usually charred area) into the undamaged area; post-luminescence time measured at the nearest second; if there is debris; if the debris ignites the filter paper or melts; if there is a merger.
-Optionally, measure the charred/damaged length according to Annex C.
-Repeat the procedure with the remaining 5 specimens within 20 minutes after the flame adjustment.